Other Miniature Painting Techniques
Special effects can be attained through many techniques. Most of the best of them start as "What it I ..." and then trying them out. I have tried all sorts of things to make special effects. Adding metallic paint or opalescent paint to your colors will give them a luster or shine, for example. At one time someone had a "what if" question that they tried out, resulting in the common techniques used in painting miniatures today. Use your imagination and get creative. I think that evidence of the evolution of miniatures painting is evidenced by looking through old White Dwarf™ or Dragon™ magazines with painted miniatures in them and comparing them to any recent White Dwarf that you might pick up. The hobby has come a long way. Perhaps the next thing that you try will end up as widely used as washing. You can get ideas from wandering through craft stores and seeing their many paints and the like, many of which were not intended for minatures, but they often work great all the same.
Skin: One technique that I use that started out this way was that I did not like the entirely flat look on skin, especially for monsters. I think that they look more realistic with just a hint of glow in their skin. For this some use brushed on satin or semi-gloss sealer. I did not like the surface shine that this technique gives, wanting a deeper glow. I added some pale white metallic, a opalescent color of antique white, to some flat skin color and drybrushed it over the muscles and lightly on the face of the Ogre that I was painting. I really liked the effect. It left shadow areas flat, gave the glow effect that I wanted, and looked almost like the creature was a bit sweaty. Nice effect.
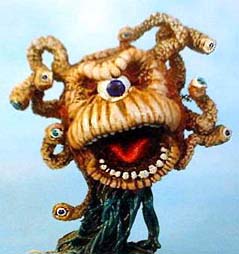
This Eye Tyrant's (The Beholder from the D&D) contrast makes it a fun piece to display. Notice the red of the tongue in contrast with the green below, colors on opposite sides of the color wheel.
Erasing Paint: To get rid of unwanted paint that I have gotten on some part of the miniature that either I have already painted and am happy with or on an unpainted section of the miniature that I don't want to have to paint over the "boo-boo" color (can you tell that I have kids at home) I use the following technique. Load a clean brush with just water. Paint over the paint that you wish to remove, preferrably when the paint is still wet. The color will wick into the wet brush a bit. Clean out the brush and leave the brush a bit wet again. Repeat until the paint is removed that was in the wrong place. Especially when you are painting areas that are in deep creases it can be difficult to get to those areas without getting paint on other areas.
Order of Painting Colors: I have heard many opinions on what works best for the order in which to paint the colors onto a miniature. What has worked best for me is to paint the hardest to reach places first and work towards the areas that are easiest to reach. I have heard this technique referred to as painting in the order that you would put on your clothes. Thus, socks get painted before shoes.
This works best for me because it is too easy to get paint on a raised area when trying to get paint into the cracks. Also, if you DO get paint on the easier to get at part when painting the creases first, it doesn't show as much when you paint over it for the raised areas. This doesn't work well if the first color applied is much darker or lighter than the one to be painted later, since you will have essentially two different colors of base coat that you are painting over.
Also, one tends to have less control over your brush and the precise placement of color in the harder to reach areas than in the more prominent ones. Thus, you are less likely to make mistakes doing the easily accessible areas of the miniature. You will really appreciate this scheme for painting order if you have ever painted an area only to bungle and paint onto an already painted area. Touching up this area messes up the other one, and so on. When I do get paint on an area that I want to remove it from, use the Erasing Paint technique above rather than trying to paint over the area. The more paint that you apply, the less details will be left showing on the miniature when you are done.
Your Techniques: If you come upon a technique not covered in this guide, please email me at cajur@hotmail.com and I would be glad to give you credit for your techniques.
worth a few dollars/Pounds/Euros?
I don't sell anything on this site, and I provide all information free of charge, so if this site has helped you, please consider donating to help support adding more content to this site. Just click on the Tip Jar image above.
If everyone pitches in just a few dollars/Pounds/Euros, I can add videos and more tutorials to serve you even better.