Drybrushing Miniatures
Once the figure has dried and you are happy with the base coat and washing, you come to a technique known as drybrushing.
In drybrushing, the idea is to highlight the raised surfaces by applying a very small amount of paint to your brush which is a lighter color than the painted area that you're drybrushing.
You drag the brush across the grain of the texture. With very little paint loaded on your brush, this will only leave paint only on the raised surfaces, simulating how light makes these surfaces lighter in color.
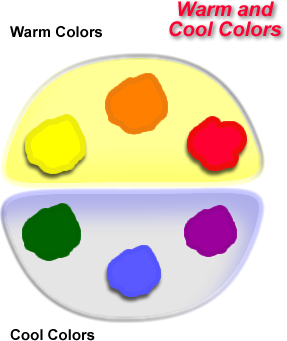
Mixing the Highlight Color
To mix a lighter color than the one that you're highlighting, you will mix with either white or a light color, such as an ivory or off-white.
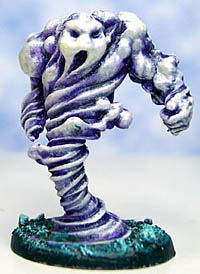
This air elemental was painted with heavy use of drybrush techniques, using a pearlescent white on top of a purple wash.
Applying Drywash
Load your brush with the lighter color that you mixed up. A flat shaped brush (rather than round) usually works best for drybrushing, because it can be easier to control.
Wipe the brush on your paper towel until very little paint is coming off on the towel. You are now ready to drybrush.
As with washing, drag the brush across the detail. Don't apply too much pressure or go too slowly, or the bristles of the brush may reach down in the shadowy cracks. If you previously applied a wash, you'll undo much of the wash.
Hold the brush perpendicular to the figure's highlights as you draw it across it. If you want to get even more outstanding highlights, mix more white into the base color and repeat, this time brushing even lighter over the details. You can do this two or three times, getting lighter each time until you may even want to drybrush with pure white VERY lightly, though this is often just a bit much. This is a matter of taste, but I tend not to get quite that white, especially for flesh.
After drybrushing, be sure to seal the miniature with a matte spray sealant. It is much better to use several fine coats of sealant instead of one heavy one. Even matte (non-shiny) sprays will often take on a shine if applied too heavily.
Here's What I Use:
Recommended Product
I love Testers Dull Cote sealer for it's non-reflective matt surface.
With Dull Cote, it's important to apply multiple light layers, rather than one heavy one. Even Dull Cote will give a shiy surface if applied too thickly.
The additive in Dull Cote which makes the surface flatt/matte and is transparent, as long as it's applied properly.
Note: The brand Model Masters is put out by Testors. This product is the same as Testors Dull Cote.
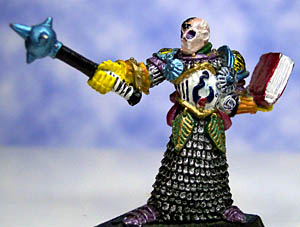
On this miniature, the chainmail armor's highlights were drybrushed with metallic silver over a black base coat to bring out the details.
Painting Progress So Far
After basecoating, washing, and drybrushing, we have three colors applied to the figure so far (besides the priming coat).
The first is the base coat, which is the basic color applied to an area of the miniature. The second is a wash, a darker version of the base coat which represents shadows or dark recesses.
The third color is applied during drybrushing, which represents highlights on areas with the most direct light. The illustration below summarizes the miniature painting process so far.
The most difficult part of painting the miniature is done at this point.
I am often lazy when it comes to basing. Basing really sets apart miniatures that look complete, and adds a lot to the overall presentation of the miniature.
worth a few dollars/Pounds/Euros?
I don't sell anything on this site, and I provide all information free of charge, so if this site has helped you, please consider donating to help support adding more content to this site. Just click on the Tip Jar image above.
If everyone pitches in just a few dollars/Pounds/Euros, I can add videos and more tutorials to serve you even better.