Applying a Base Coat of Color
Once you have decided on a color scheme, you can begin to paint the base coat. If you are going to do any washings later, you will want to pick a color that is slightly lighter than the color that you want to end up with. This is because the wash will tend to darken the base color before you are done.
Several Thin Coats - Not a Single Thick One
One of the sure signs of a beginner miniature painter is using paint straight out of the bottle. They don't dilute it.
The result? The thick paint obscures the fine details of the miniature, the very thing which separates cheap minis from great ones.
When starting out, thin your acrylic paints with water until they have a thickness similar to milk. Don't load your brush with too much paint at a time to keep it from flowing outside of the area you're painting. Wipe off any excess paint from your brush on a paper towel or napkin.
As you paint the base coat, prevent the paint from pooling in recesses of the miniature, which would fill in details.
If you get too much paint on any part of the miniature, before the paint dries, clean and dry your brush. Then use it like a sponge to mop up any excess paint.
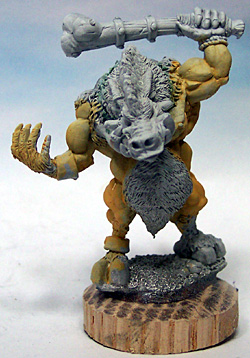
Notice how thin the first coat of paint is when applied. This prevents loss of fine detail. Within another coat or two of paint, you build up an opaque base coat, while preserving the details.
Use a Wet Palette for Better Control Over Paint Thickness
When using a regular "dry" palette to mix and thin your colors, it can feel like you're playing "beat the clock." The paint is constantly drying and getting thicker.
With a wet palette like the one at the right, you mix and thin paints on a paper sheet that lays on top of a damp sponge. This keeps your paint consistently thin, and paint you mix today can be good for up to a week later, so custom mixed colors won't dry up before you get a chance to use them. I HIGHLY recommend using a wet palette like this one.
Paint Inner Areas First
I like to start with the deepest, hardest to get to areas first, working my way outwards to the most easily accessible areas. Some painters have described it as painting items on the miniature "in the order you would get dressed." Since shoes go on after socks, paint the socks first. This works fairly well since if you get paint on the shoes when painting the socks, this area will then get painted over anyway when you paint the shoes.
This part of painting the miniature reminds me of the old paint-by-number paintings. You just fill in the colors. You are trying to get a nice, opaque covering of each area. If I am going to wash with inks, I normally will go ahead and do all of the base colors before proceeding. If you intend to wash with paint, it is best to do one section at a time by doing the base coat, washing, and then drybrushing, as you will be working with variations on your base color and won't want it to dry out before you get done.
Next Step - Washing to Bring Out Shadowsworth a few dollars/Pounds/Euros?
I don't sell anything on this site, and I provide all information free of charge, so if this site has helped you, please consider donating to help support adding more content to this site. Just click on the Tip Jar image above.
If everyone pitches in just a few dollars/Pounds/Euros, I can add videos and more tutorials to serve you even better.