Painting Armor on Miniatures
Armor is a special case to paint if you want it to appear as medevial armor, which was often made of metal that tended to corrode. The best method that I have seen is to paint it with a black base coat of paint. To this you will drybrush silver onto it. This gives a nice look of armor that has corroded with some of the metal shining through. Drybrush more heavily on those areas where the light would reflect off the armor more to add highlights.
For newer, shinier armor, paint the armor solid in the color of the metal (bronze, iron, etc.) mixed with black. About 3 parts metallic paint to 1 part black should do nicely. Then wash with black to highlight the cracks. When this has dried, drybrush with the original color (no black added) of the metal. Finally, drbrush lightly with the pure metal color with white added. This last step should be done very lightly with care taken to ensure that most of the paint has been rubbed off onto a paper towel before beginning to drybrush. This is just a final highlight to depict light shining off the armor.
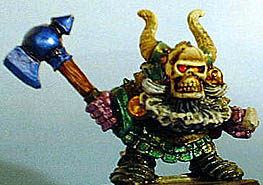
This dwarf's armor and axehead show the use of metallic paints with a wash applied.
Painting Chainmail
For chainmail, first mix up some black paint with 1 part water per three parts paint. This makes a thinned paint somewhere between full coverage and a wash. Paint this over all areas with chainmail on them. It should settle into the cracks like a wash, but it will dry with an intense black in the cracks of the chainmail. Mix up some gunmetal (black + silver 1:1) or a dark version of whatever metal that you are using (mithril: black + silver + blue).
Drybrush this over the chainmail to make the high points of the mail B stand out. Then use the pure metallic color (no black added) to drybrush, doing so more lighly and applying less paint than before.
Finally, add the pure metallic and white about 1:1 and very lightly drybrush the armor in the areas that will be most exposed to the background light, namely the shoulders, some on the chest, etc. Mainly the light will be most intense the higher up on the figure that you go. Just picture rays of light coming from directly overhead to see where the light shines on it at the closest to perpendicular angles as it strikes the chainmail. Drybrushing for chainmail should be done with downward stokes, which will make the highlights emphasized on the bits of the mail that reflect the most light.
Painting with Interesting Metallic Colors
You can get the effect of different metals by drybrushing with other metallic colors. Gold mixed with brown will give a bronze or brass look.
Black mixed with silver will give an iron or gunmetal look. Blue and silver mixed give a blued steel look, or the classic color of mithril in fantasy works. Red added to silver can give neat effects for metal as well
All of these combinations can be used as a base color as well, washing with ink over them for a good effect.
For swords you will want to paint the sword with the base color that you want, one of the metallic combinations above perhaps, then wash with black and drybrush with gold or silver, depending on which was the base metallic color.
Painting Shields
Shields can be done much the way that swords are. You may want to add symbols of heraldry to the shield. Simple ones might be a harlequin design, half one color, half another, leaving a border of the original metallic color. One can get elaborate and paint designs or dragons, etc on it as well.
You can get as elaborate as your artistic talent will take you. Some hobby stores sell lift off decals, like the ones used on model airplanes, that you can use for shield designs. Some are available at hobby stores that carry model airplane supplies as decals for model airplanes. You might find just what you want and aviod painting intricate designs by hand.
Armor and Chainmail
worth a few dollars/Pounds/Euros?
I don't sell anything on this site, and I provide all information free of charge, so if this site has helped you, please consider donating to help support adding more content to this site. Just click on the Tip Jar image above.
If everyone pitches in just a few dollars/Pounds/Euros, I can add videos and more tutorials to serve you even better.