Painting Miniature Flags
There are generally speaking three ways to make flags and banners that are commonly used.
Flag Method One
The first is probably the easiest. That is to draw the design that you want on the flag as small as you can and still get good detail. Then you use a reducing photocopier to reduce the design to the size appropriate for the size of flag that you need.
For the final copy, use heavy bond resume paper, which will have a bit of a cloth content in it. It is also called "rag" paper because of this. This is a durable paper and will not get damaged as easily as lighter bond paper.
You then can paint the flag with small brush and get a nice effecet.
Attatch this to wire as a flag pole with some super glue, taking care not to use too much. You can make a mess in a hurry. You can even use a large headed straight pin, the type that come with corsages, and have an ornamented pole. The head can be painted gold or silver to look fancy.
Once the glue dries, you can make the effect of the flag waving in the wind by making "waves" in it by partially wrapping the paper around a round pencil and then switching sides and repeating, curling it the other way.
Make several waves in it. The higher that the wind is blowing the more straight that the flag will be. In calm weather a flag will tend to have a lot of folds and double over a lot.
If you want to get really fancy you can cut up gold embordry floss into 1/8" sections and glue these individually to the edge of the flag or make a decorative cord hanging from the top of the flagpole. Entwining gold and silver would look good as well. This is the shiny floss only. The type that looks like thread and has no lustre would not look as good.
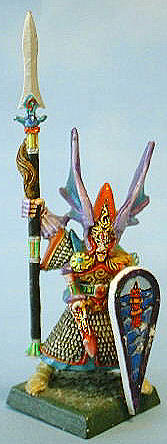
The shield on this miniature was hand-painted in much the way that a flag can be.
If you are patient, you could even make a little tassle to attatch to the end of it by doubling over several pieces 1/4" long and then tying around the loop that you create by doubling them over with a small length of the stuff, around the tassle several times. You will have to glue this with a SPECK of hot glue to keep it from coming untied. You can hot glue the tassle to the end of the decorative cord.
To hide any excess glue, paint the bit of glue showing gold as well, or better yet, gold with a bit of black mixed in. Basically just match the color as well as you can.
Flag Method Two
The second way that is often used is to use cloth to make the flag out of. Draw the design that you want directly on the fabric in colorbook outline fashion. A cheesecloth would work well for the fabric.
Once you have done this, attatch the flag to what will be the standard pole with craft glue. The best way to do this is to butt the edge of the cloth directly up to the pole until it just touches the wet glue that you previously apply to the pole. Let it dry. You can loop the cloth around the pole, but this will look less natural.
Once you have attatched the flag and the glue has dried, dip the cloth in a solution of 2:1 water and household white glue. Take the wet flag and put the crincles and folds that would be in the cloth from the flag waving in the breeze and keep the flag in this position until it dries.
To accomplish this you can poke the flagpole into the pages of a stack of closed books, the bottom of the flag just touching a plate, which you will place on the table to protect the tabletop surface. It is easier to detatch the glued banner from a plate than a wooden table top as well. When dry, the flag will hold the shape of the folds that you placed in it. Now you can just paint the flag with the design that you have outlined earlier.
Flag Method Three
The third technique involves using lead foil. You can get this from home wine brewer's shops. The foil is used for labels and often covers the top of the wine bottle. You can also use the metal from used tubes of toothpaste (the non-plastic tubes). Empty out the toothpaste tube then cut out one side of the tube lengthwise.
Cut off the end where the metal is crimped as well as near the top where the cap is. You should end up with a rectangular shaped piece of foil. Often this is actually aluminum rather than lead. Clean off the toothpaste from it with hot soapy water. You can paint your design directly onto the foil after priming.
Attatch to the standard pole as with the techniques above, though you may find that superglue works better than household glue for glueing metal to metal. Put the folds and creases of the flag into it. The metal will hold the shape pretty well.
worth a few dollars/Pounds/Euros?
I don't sell anything on this site, and I provide all information free of charge, so if this site has helped you, please consider donating to help support adding more content to this site. Just click on the Tip Jar image above.
If everyone pitches in just a few dollars/Pounds/Euros, I can add videos and more tutorials to serve you even better.